1. 이전 포스팅 확인하기
https://growingsaja.tistory.com/888
[Objective-C] 앱 만들기 입문 - 2 : 세로 정렬 카드뷰 만들고 안에 문구 및 활성화 스위치 넣기
1. 이전 포스팅 확인하기 https://growingsaja.tistory.com/887 [Objective-C] 앱 만들기 입문 - 1 : 하단 메뉴탭바 만들기 1. 시작 전에 프로젝트 코드 기본 세팅하고 오기 https://growingsaja.tistory.com/869 [Objective-C]
growingsaja.tistory.com
2. 이전 작업에서 문구 일부 수정 반영
// vim Controller/SpotGoodsTrackerListVC.h

#import <UIKit/UIKit.h>

// Second 탭에 올 SpotGoodsTrackerListVC라는 이름의 뷰 컨트롤러 클래스를 선언합니다.
@interface SpotGoodsTrackerListVC : UIViewController

@end
// vim Controller/CurrencyTrackerListVC.m

#import <Foundation/Foundation.h>
#import "SpotGoodsTrackerListVC.h"

@implementation SpotGoodsTrackerListVC

- (void)viewDidLoad {
    [super viewDidLoad];
}

@end
3. 예제 소스코드로 수정하기
// vim Controller/SpotGoodsTrackerListVC.h

#import <UIKit/UIKit.h>

// SecondViewController라는 이름의 뷰 컨트롤러 클래스를 선언합니다.
@interface SpotGoodsTrackerListVC : UIViewController {
    UIScrollView *scrollView;
}

@end
// vim Controller/SpotGoodsTrackerListVC.m

#import <Foundation/Foundation.h>
#import "SpotGoodsTrackerListVC.h"

@implementation SpotGoodsTrackerListVC

- (void)viewDidLoad {
    [super viewDidLoad];

    // 스크롤뷰 초기화
    scrollView = [[UIScrollView alloc] initWithFrame:self.view.bounds];
    [self.view addSubview:scrollView];

    // 콘텐츠 크기 설정
    CGSize contentSize = self.view.bounds.size;
    contentSize.height *= 1.5;
    [scrollView setContentSize:contentSize];

    // 콘텐츠 추가
    UILabel *topLabel = [[UILabel alloc] initWithFrame:CGRectMake(0, 0, self.view.bounds.size.width, 50)];
    topLabel.text = @"Top Label";
    topLabel.textAlignment = NSTextAlignmentCenter;
    topLabel.backgroundColor = [UIColor lightGrayColor];
    [scrollView addSubview:topLabel];

    UILabel *bottomLabel = [[UILabel alloc] initWithFrame:CGRectMake(0, contentSize.height - 50, self.view.bounds.size.width, 50)];
    bottomLabel.text = @"Bottom Label";
    bottomLabel.textAlignment = NSTextAlignmentCenter;
    bottomLabel.backgroundColor = [UIColor blueColor];
    [scrollView addSubview:bottomLabel];


}

@end
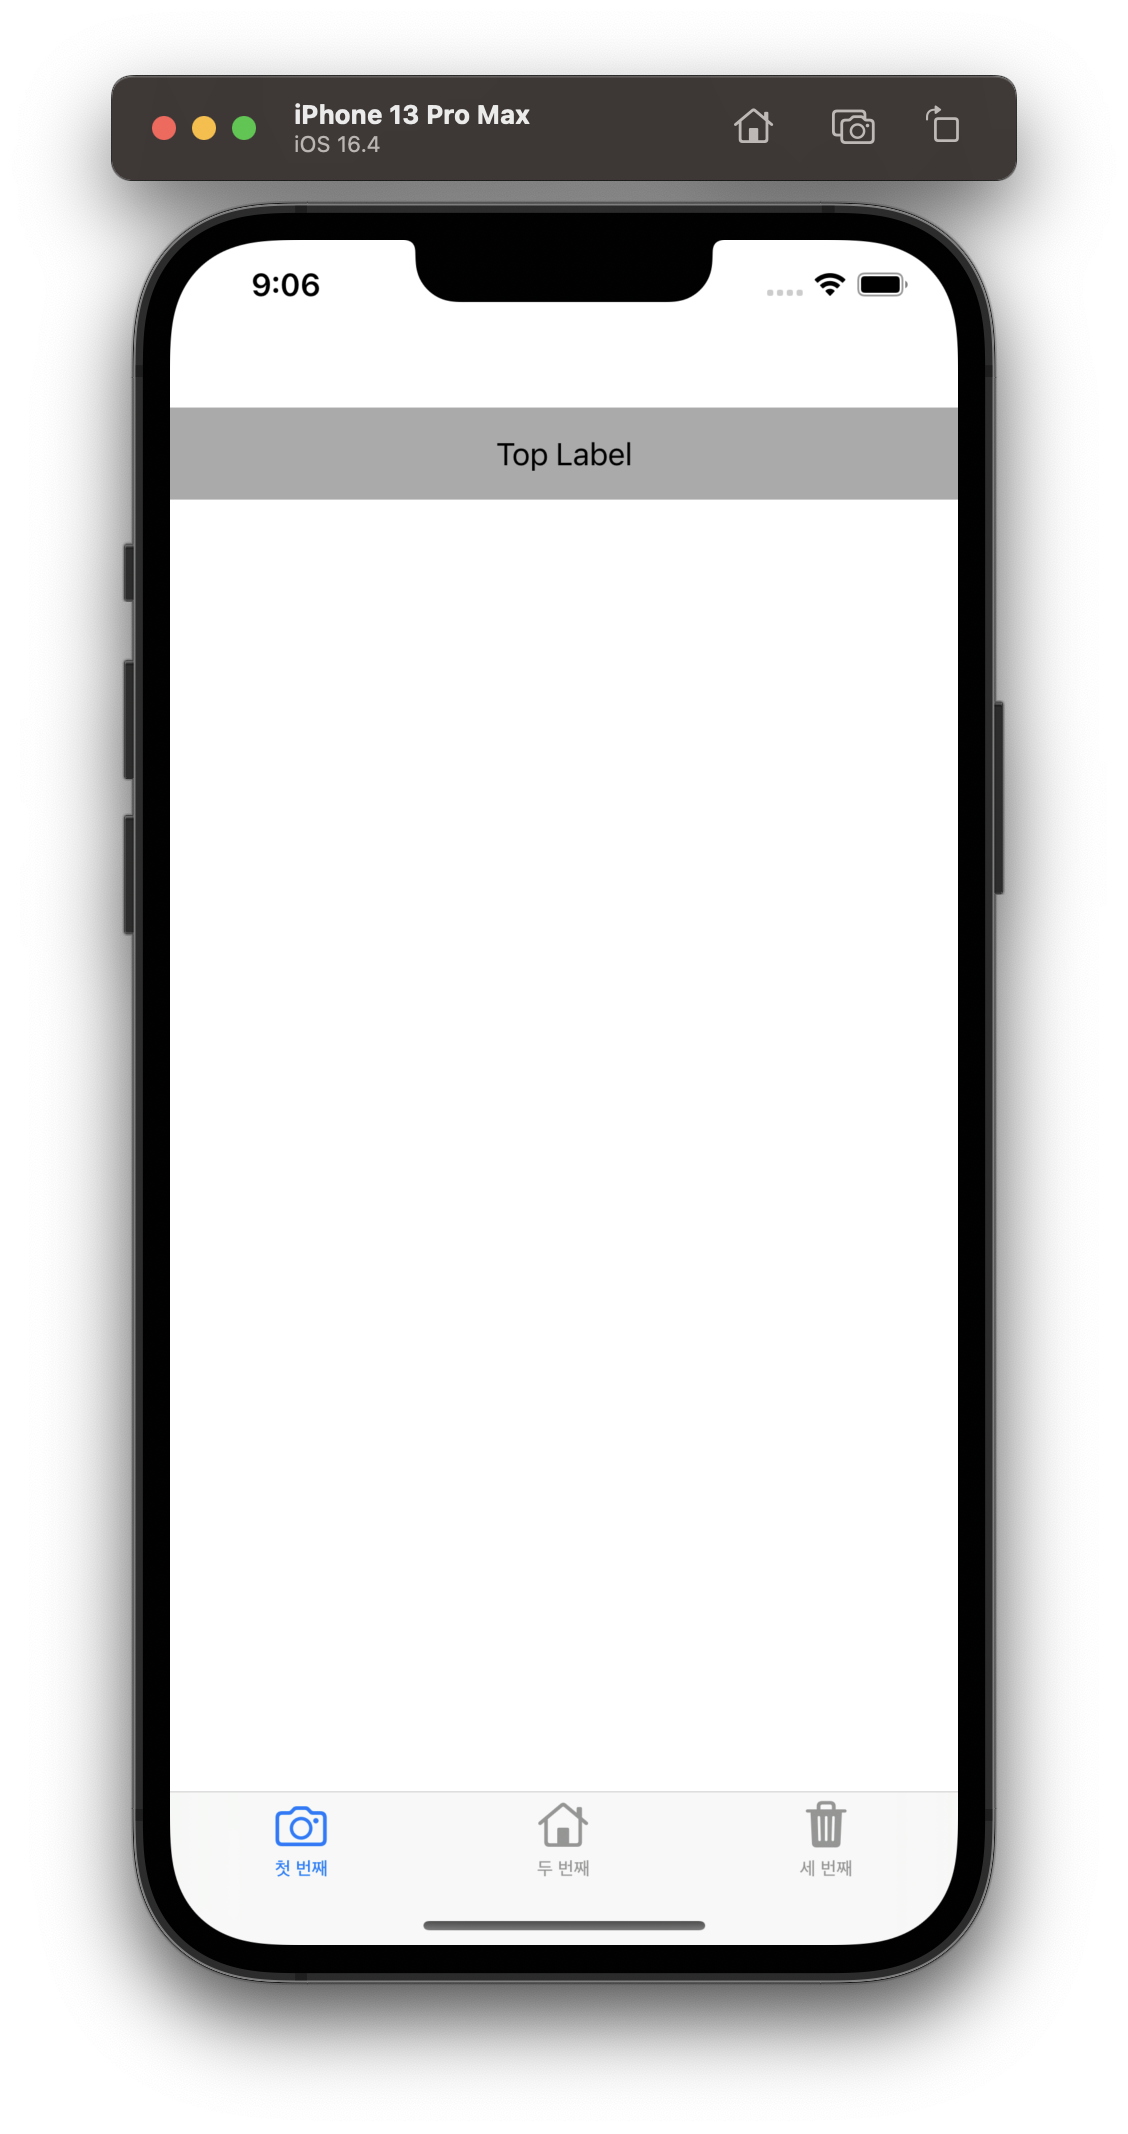
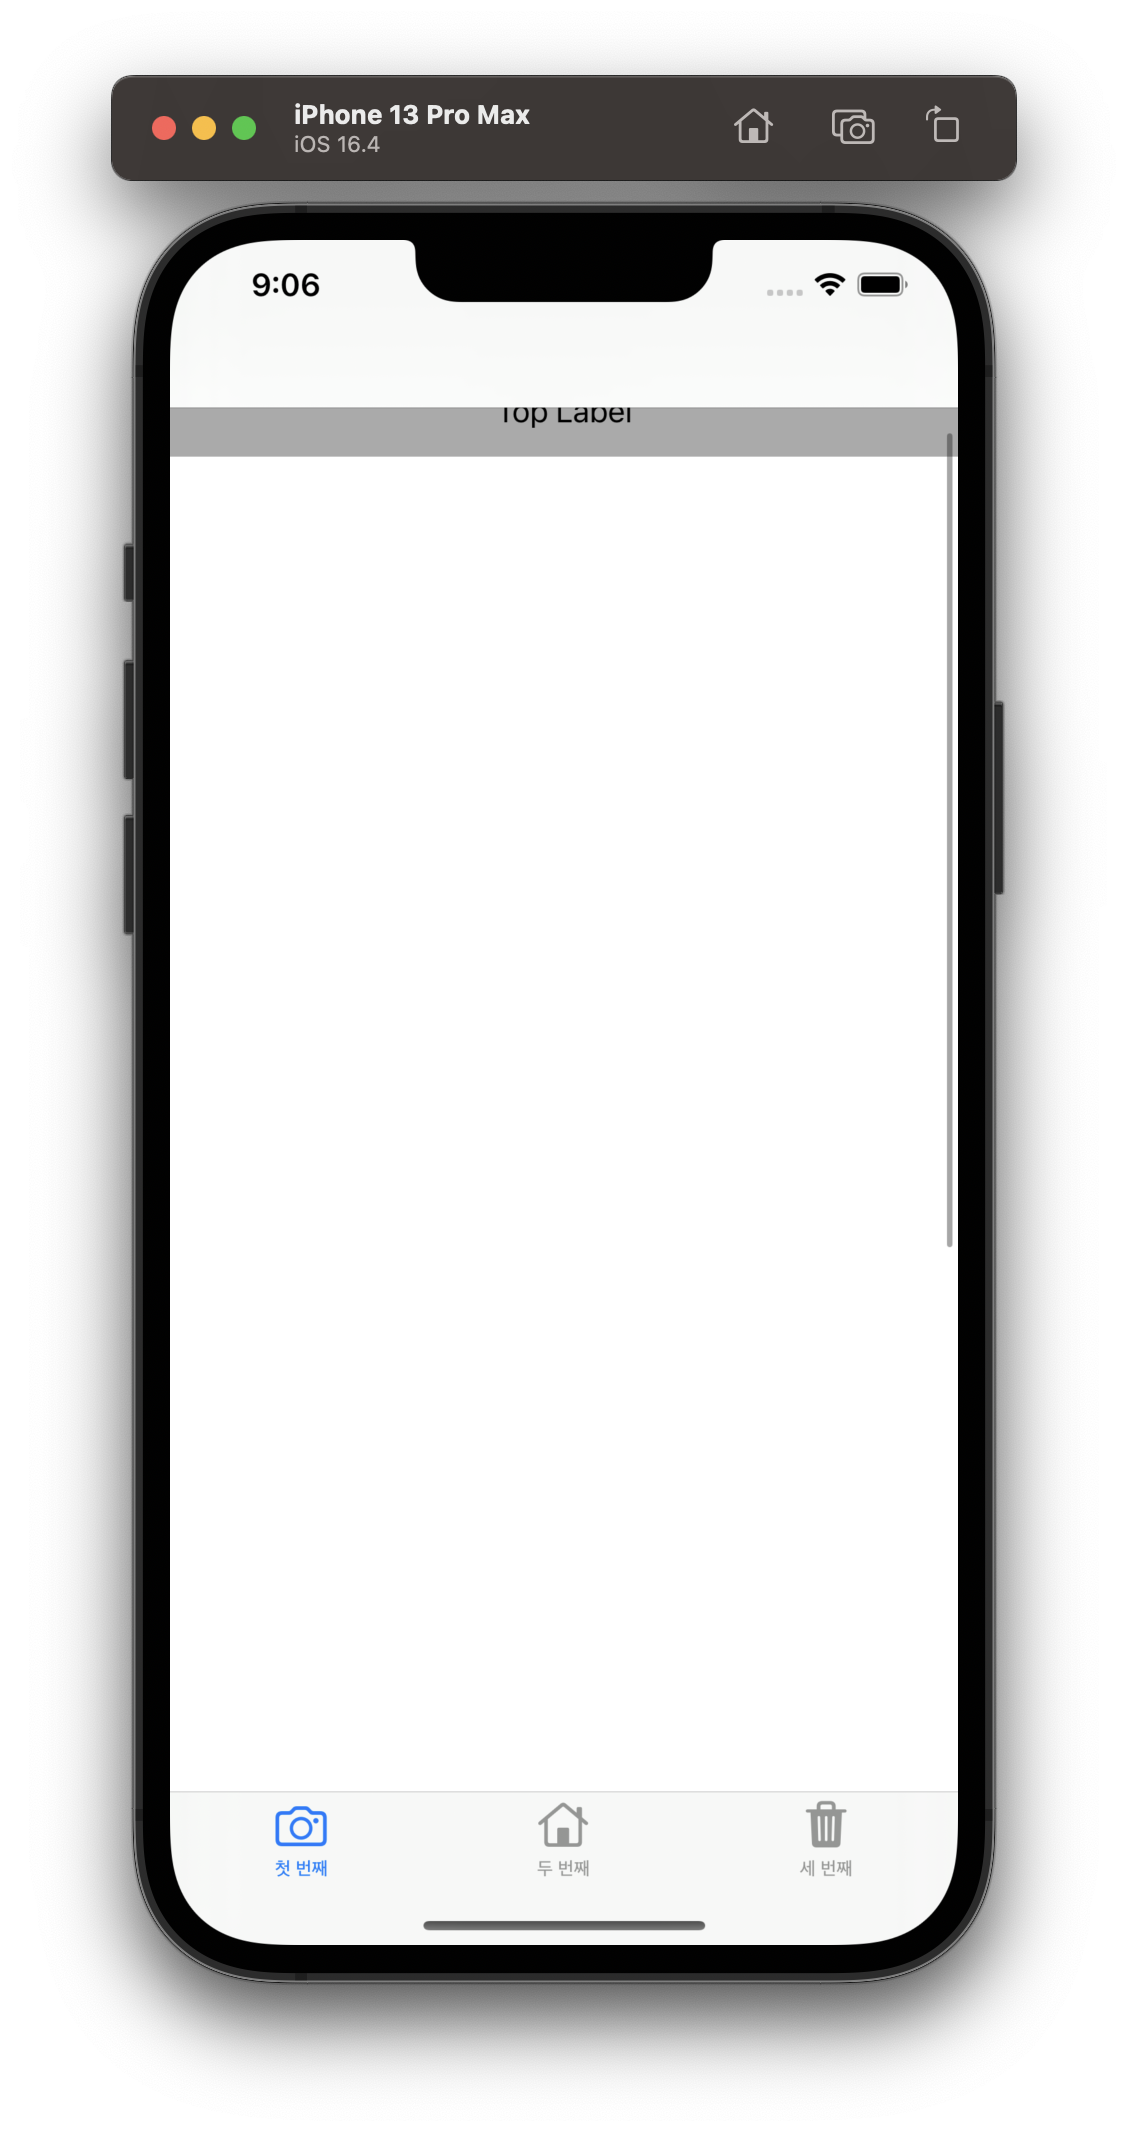
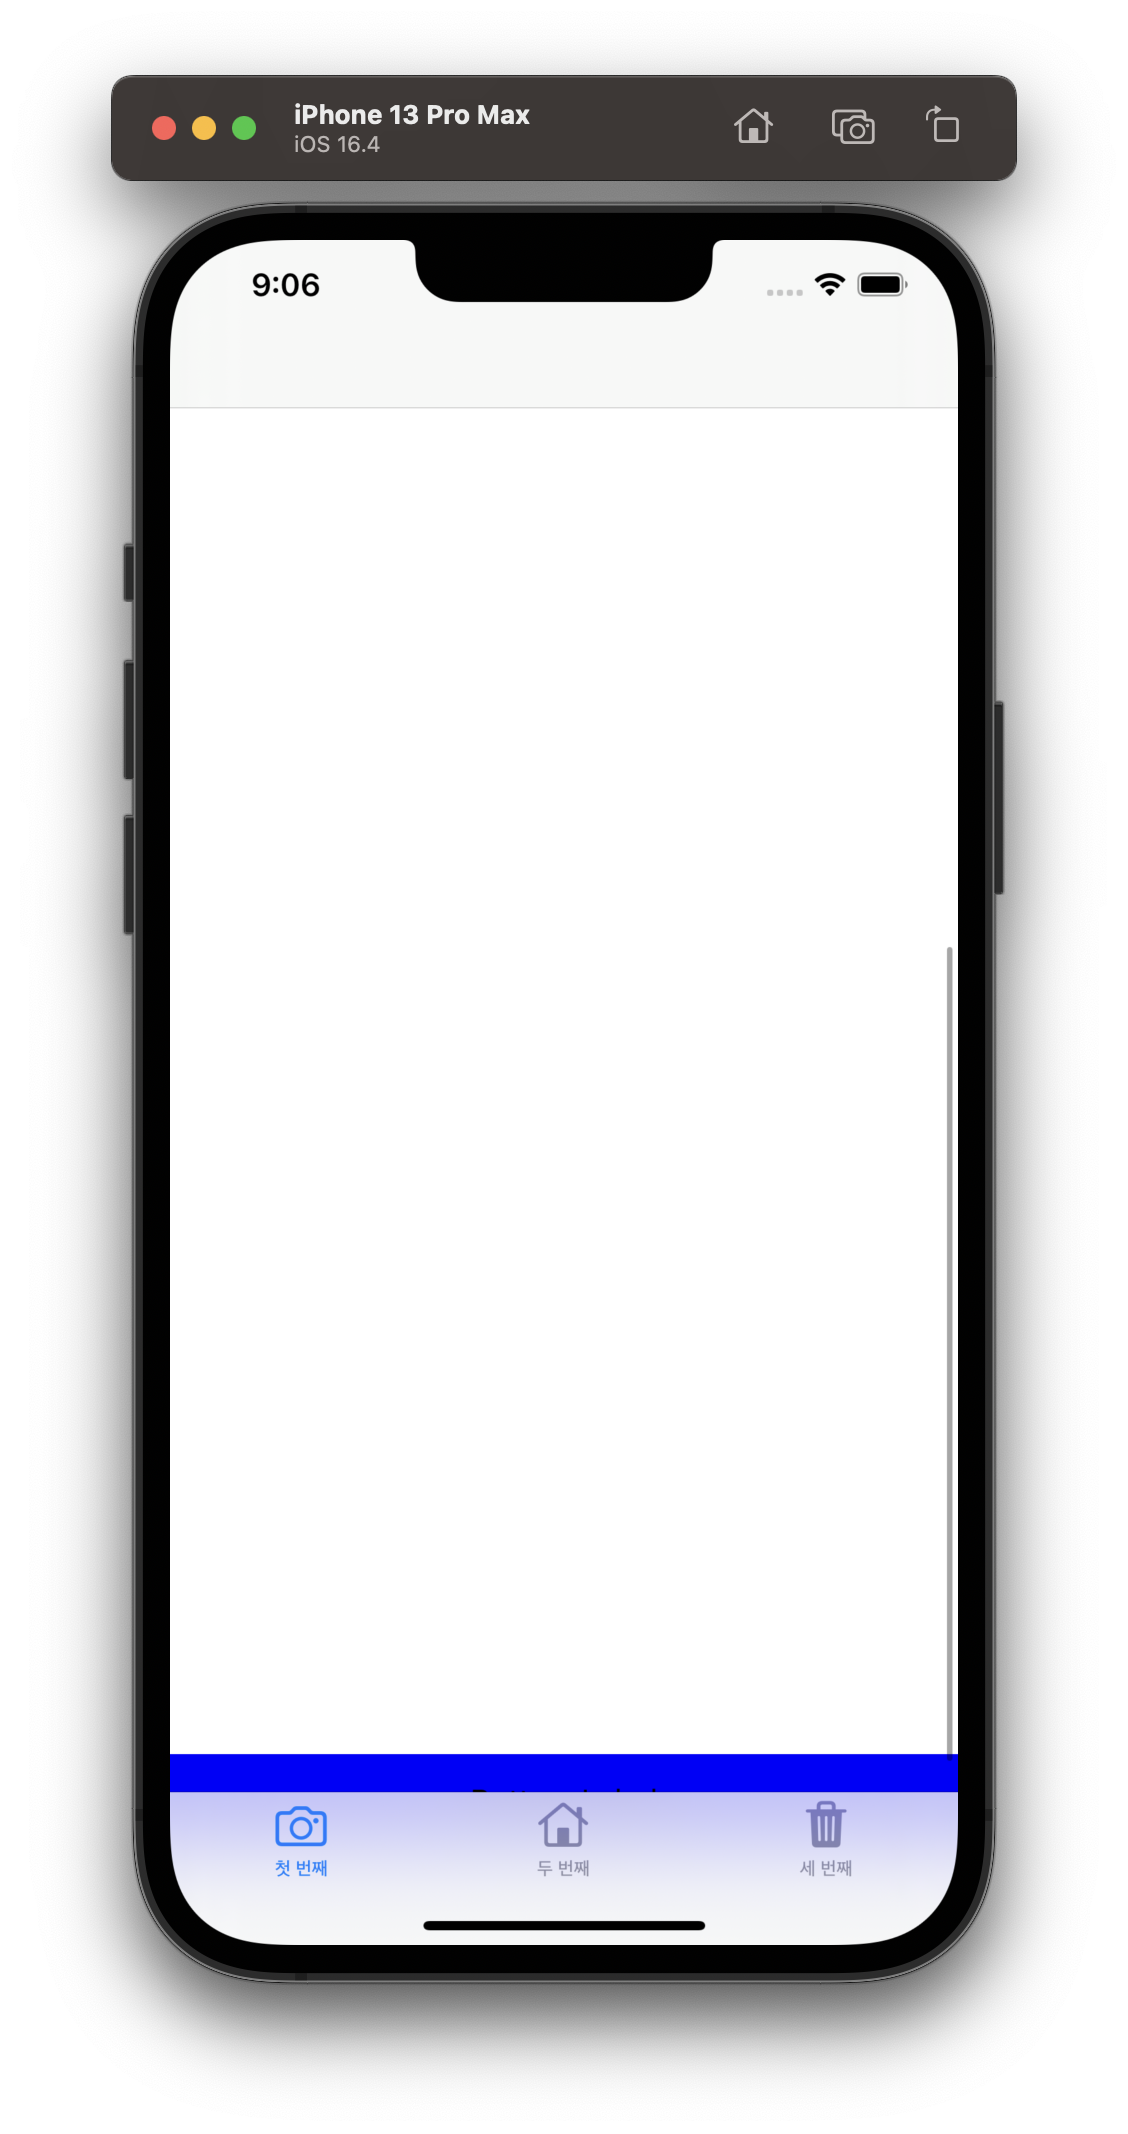
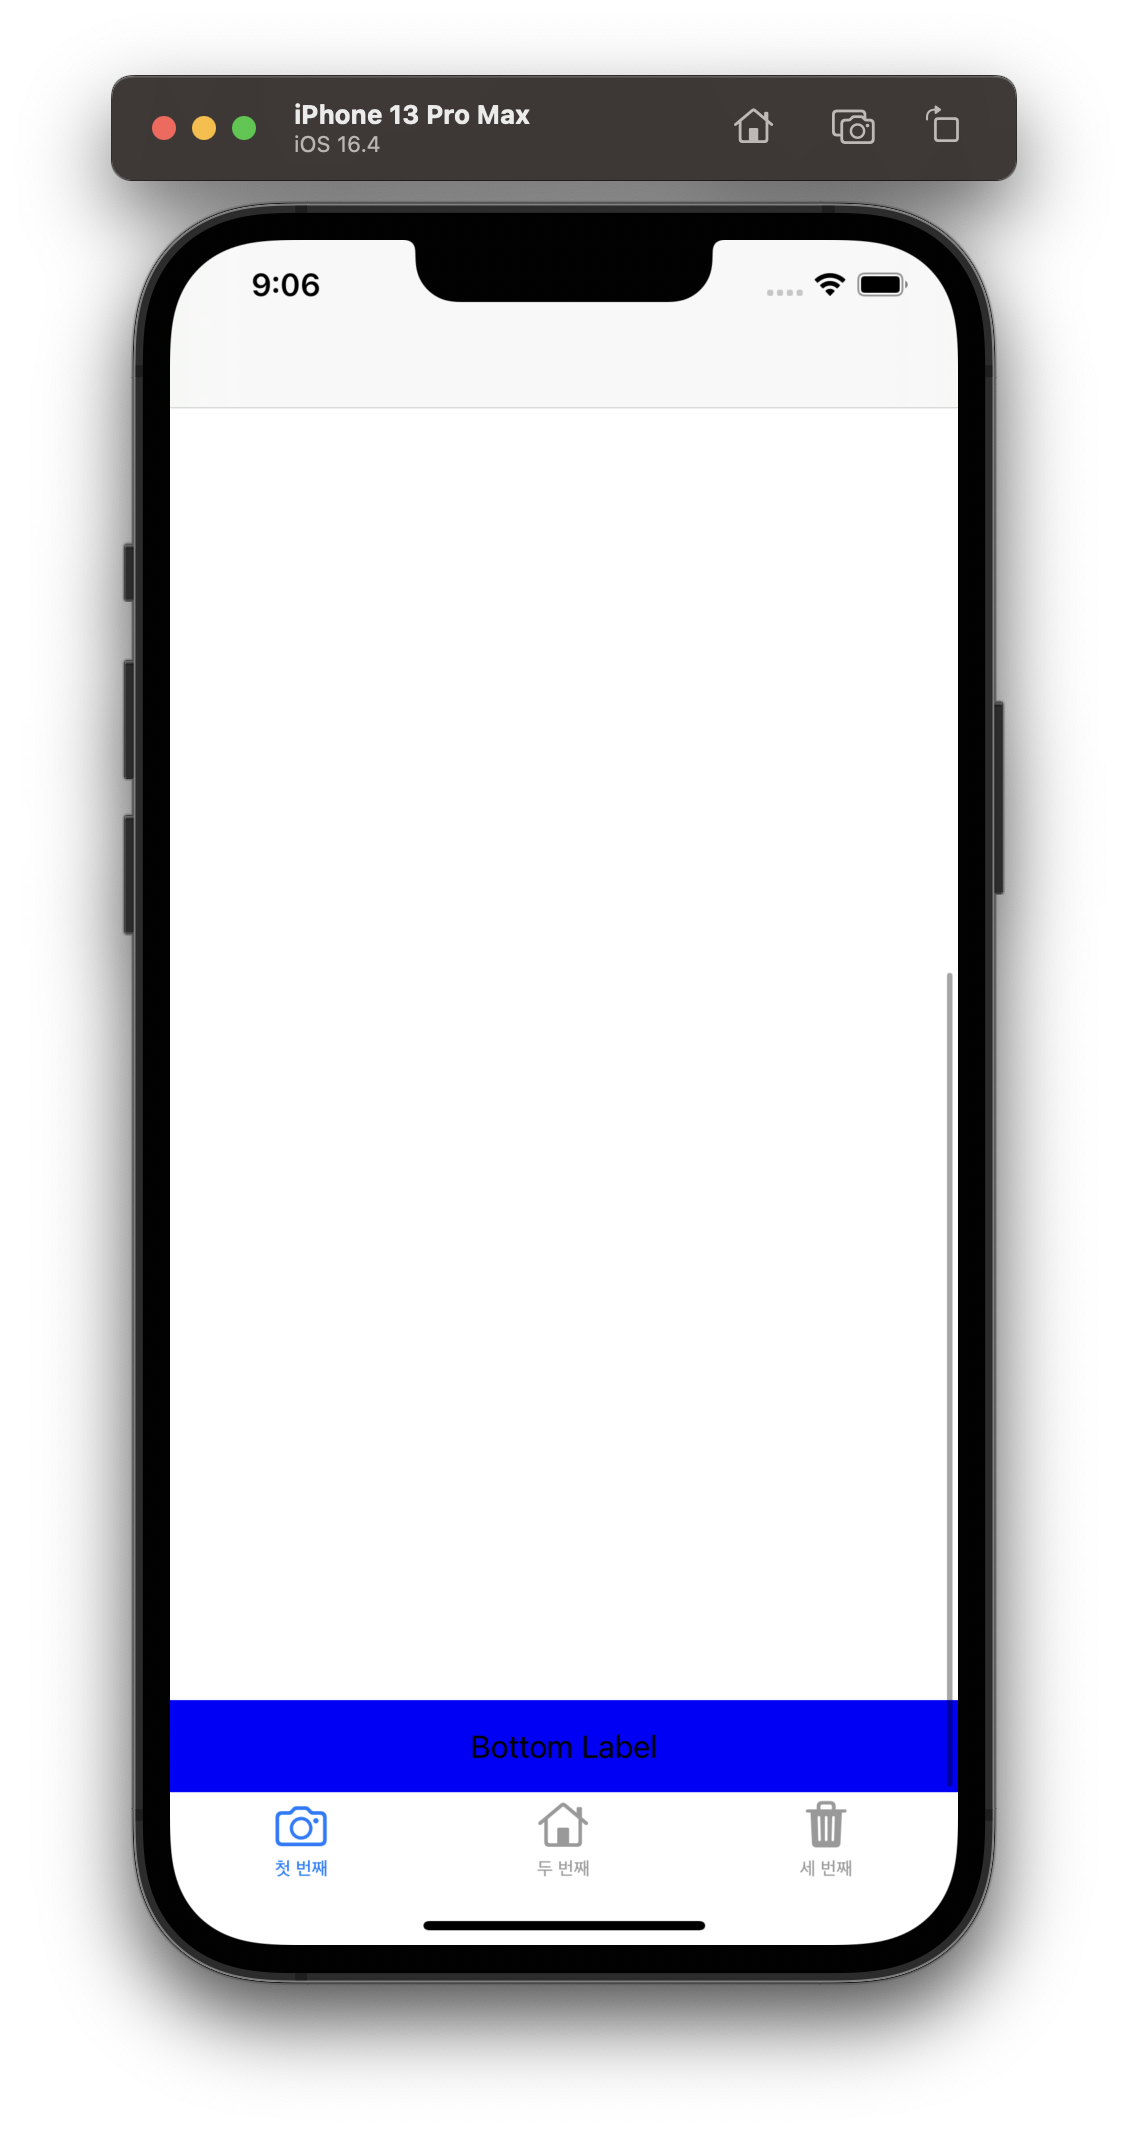
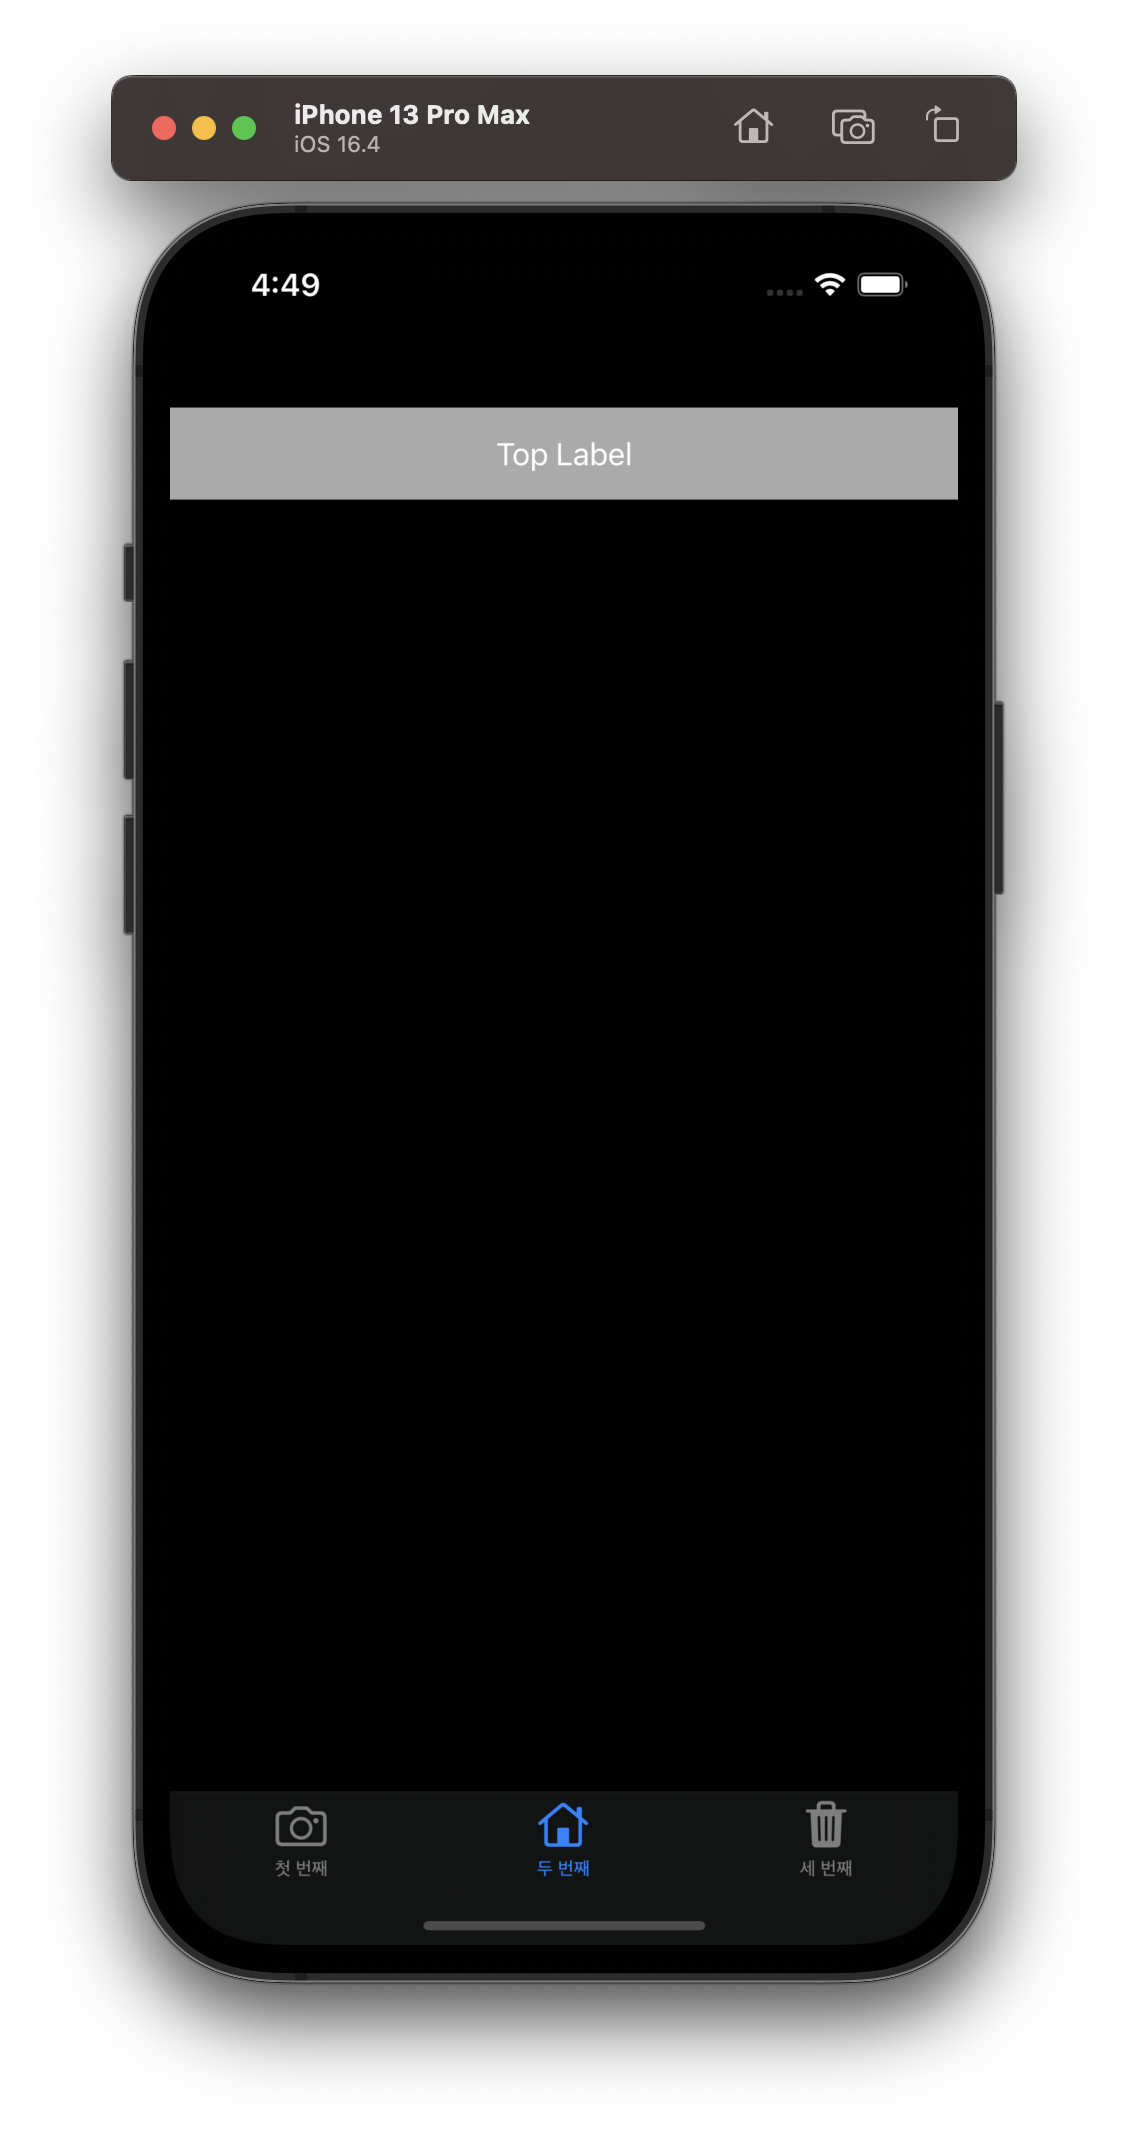
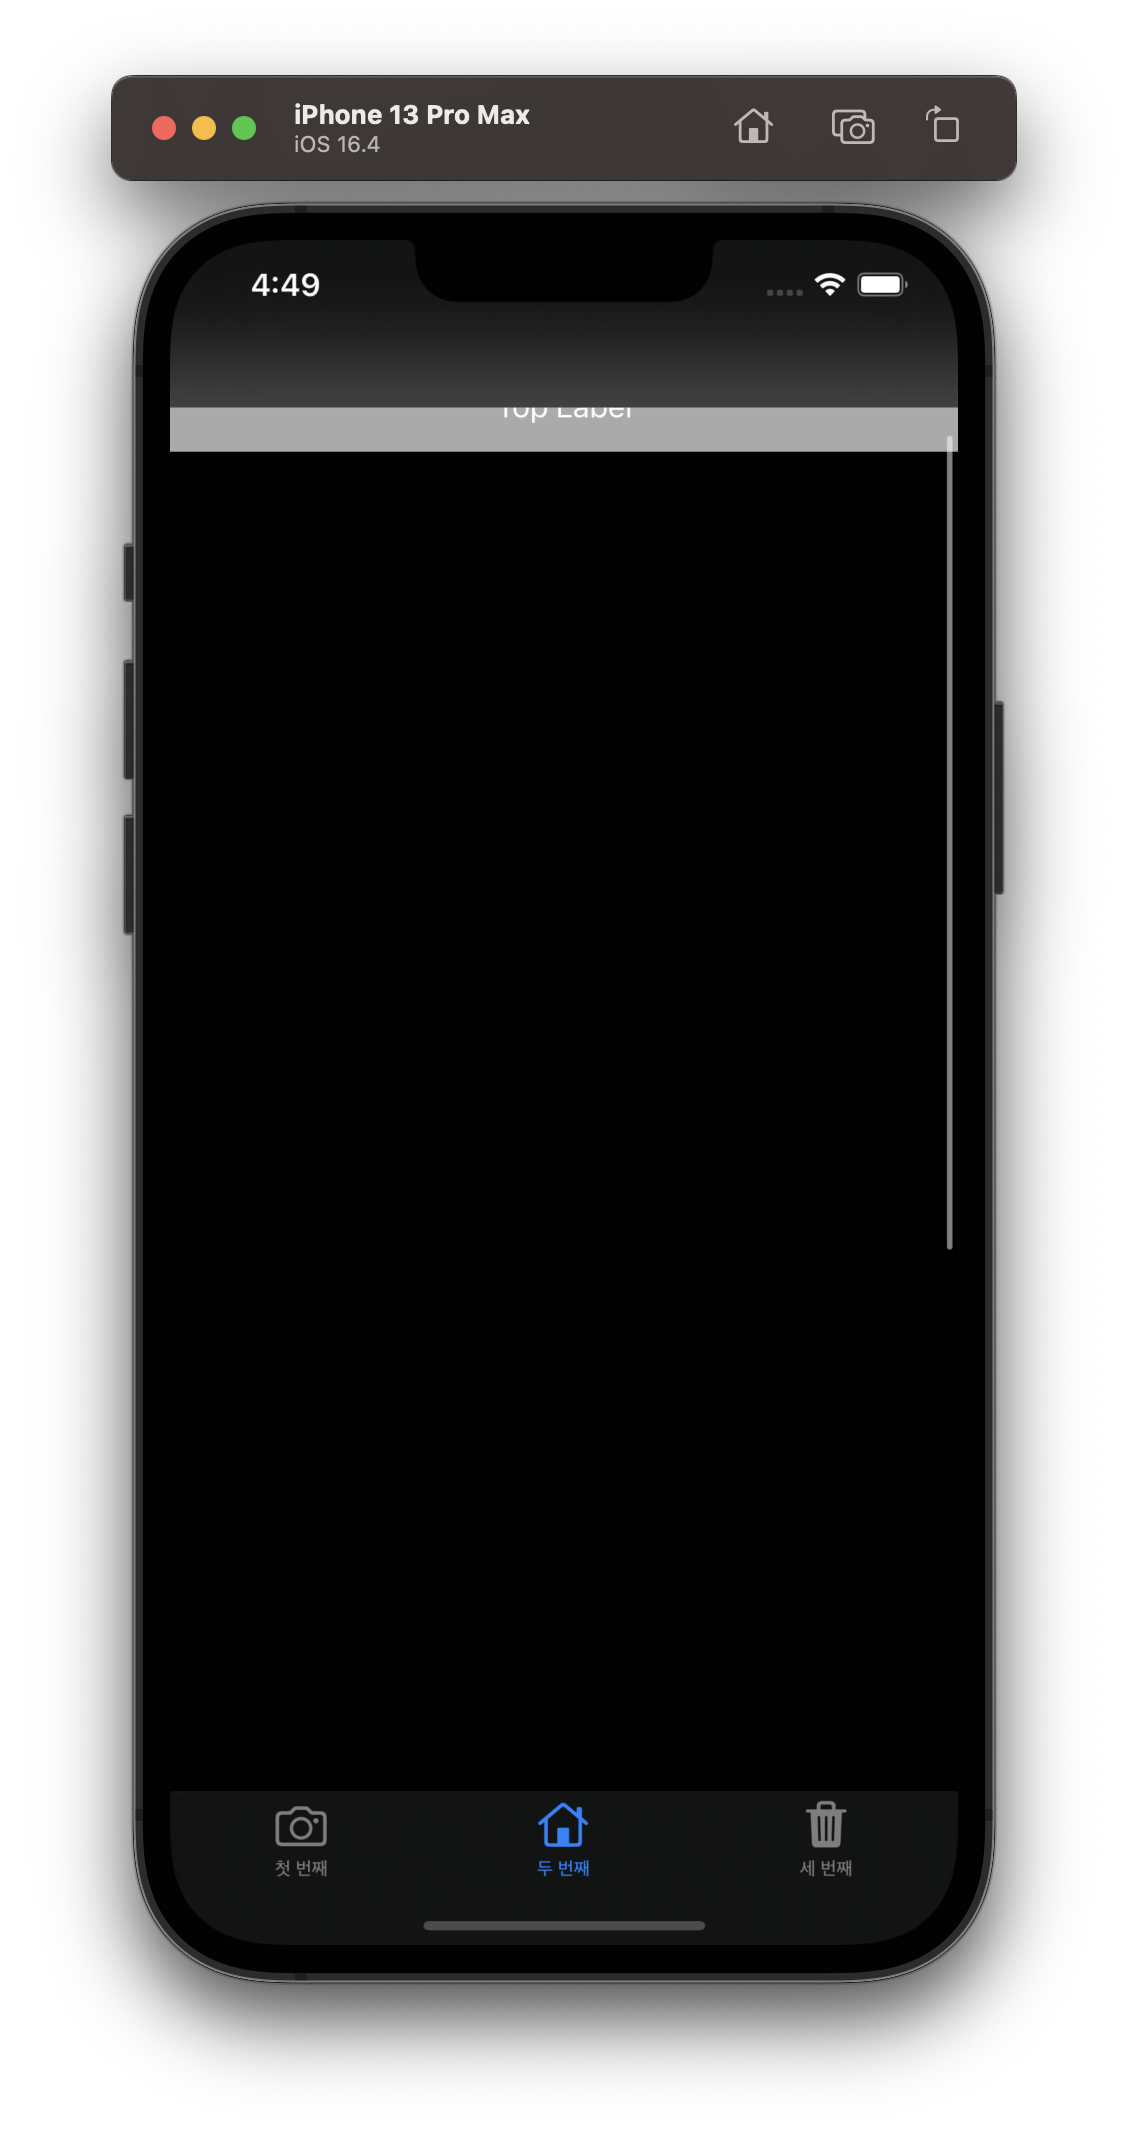
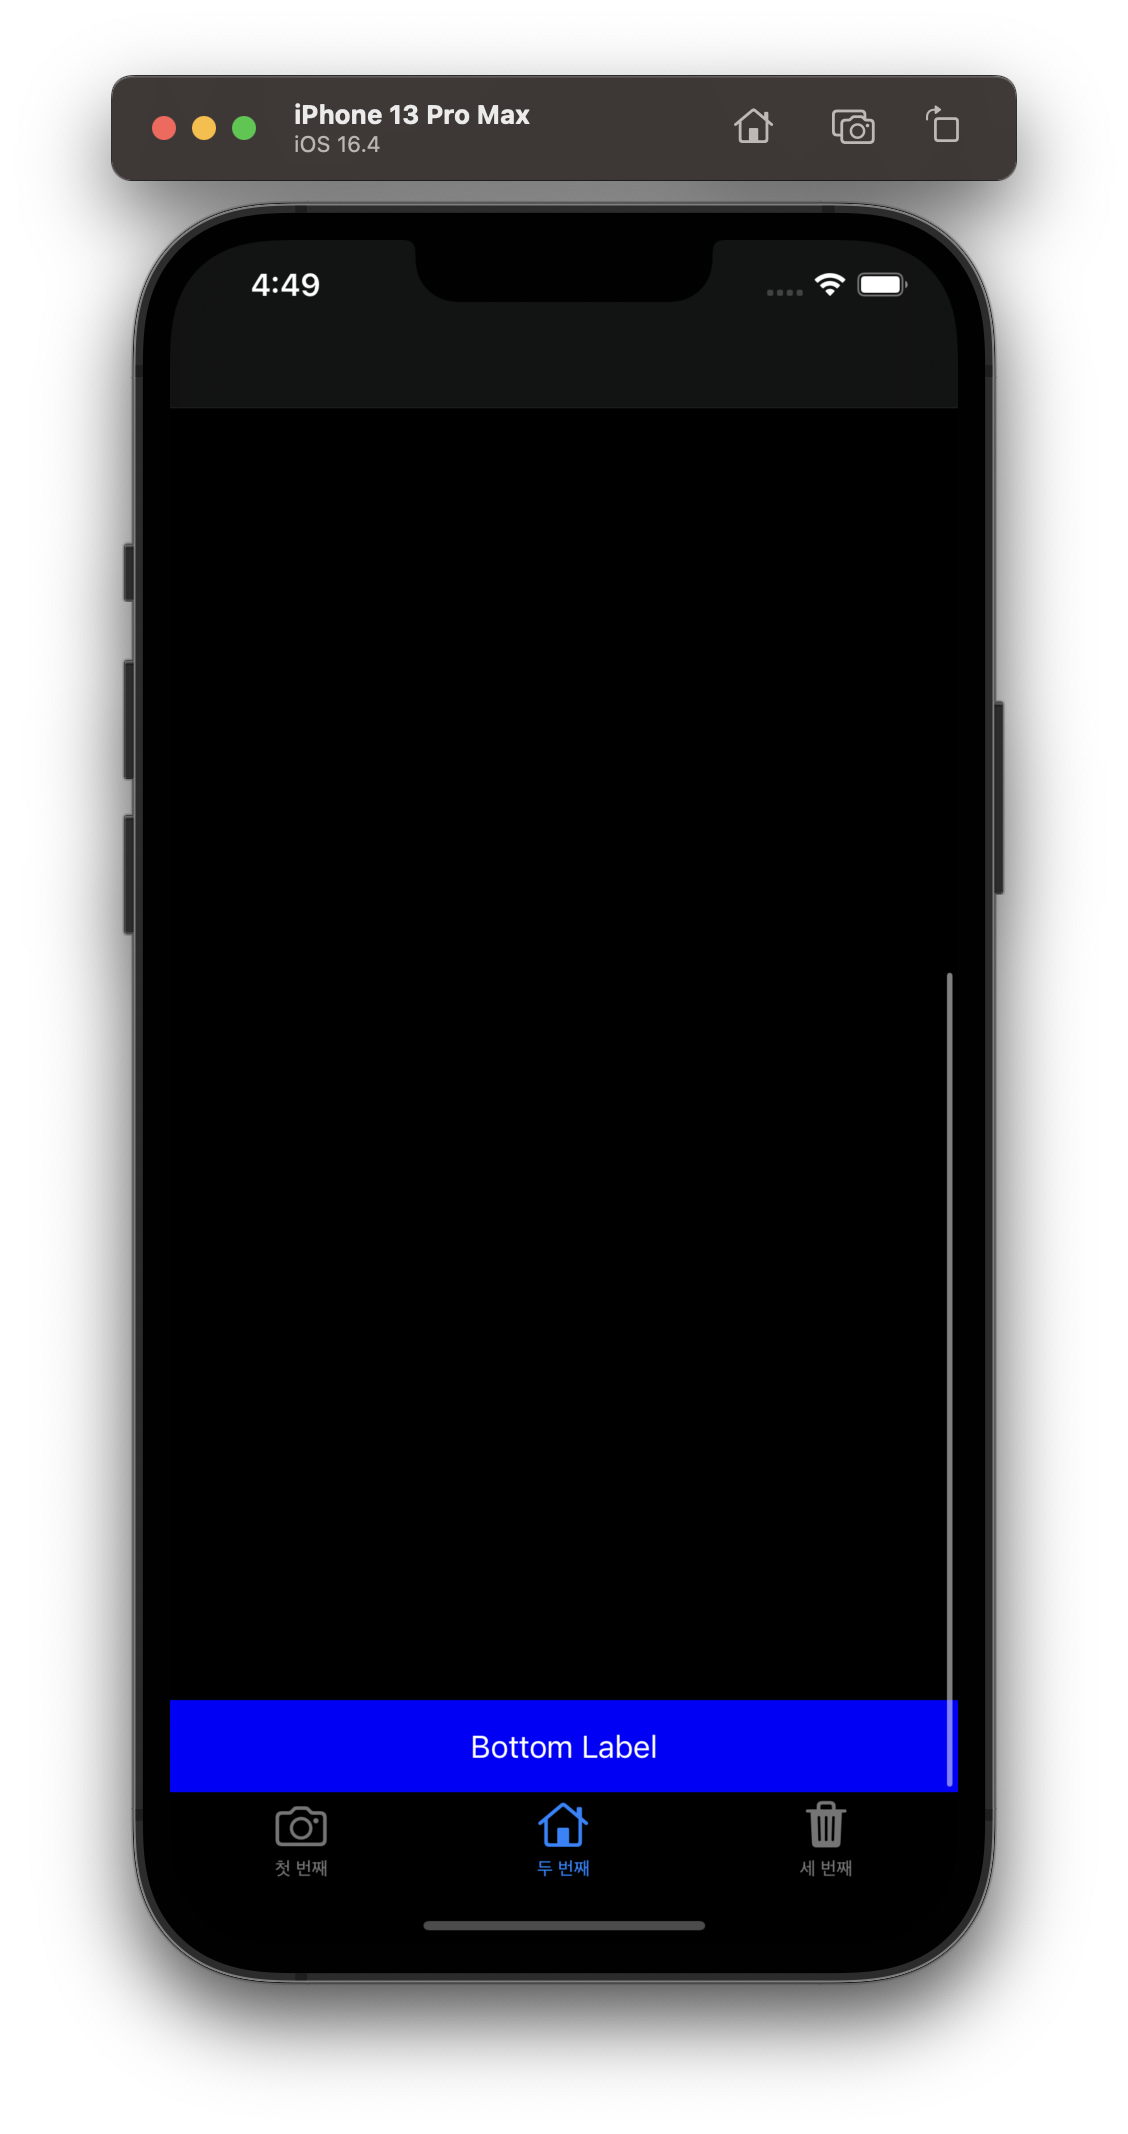
4. 결과 예시
2번째 탭에 라이트모드, 다크모드 각각 다음과 같이 노출됩니다.

5. 1번째 탭에 스크롤뷰 추가하고, 그 안에 카드 목록 노출 기능 구현하기
// vim Controller/CurrencyTrackerListVC.h

#import <UIKit/UIKit.h>

// SecondViewController라는 이름의 뷰 컨트롤러 클래스를 선언합니다.
@interface CurrencyTrackerListVC : UIViewController {
    UIScrollView *scrollView;
}

@end
// vim Controller/CurrencyTrackerListVC.m

#import <Foundation/Foundation.h>
#import "CurrencyTrackerListVC.h"

@implementation CurrencyTrackerListVC

- (void)viewDidLoad {
    [super viewDidLoad];

    // viewDidLoad 메서드에서 스크롤 뷰를 초기화하고 설정합니다.
    scrollView = [[UIScrollView alloc] initWithFrame:self.view.bounds];
    scrollView.backgroundColor = [UIColor clearColor];
    [self.view addSubview:scrollView];

    // 카드뷰에 표시할 데이터를 초기화합니다.
    NSArray *cryptocurrencyNames = @[@"Bitcoin", @"Ethereum", @"Ripple", @"Litecoin", @"Bitcoin Cash"];
    NSArray *cryptocurrencyPrices = @[@"$33,000", @"$2,500", @"$0.7", @"$120", @"$400"];

    //카드뷰 배치에 필요한 변수를 설정합니다.
    // 카드 목록 나열될 공간 세팅
    // ****************************** //
    // 목록 상단 공백 margin 설정
    CGFloat cardViewTopStartMargin = 10.0;
    // 카드 목록의 좌우 공백 각각의 margin
    CGFloat horizontalMargin = 2;
    // 카드와 카드 사이의 공백
    CGFloat cardViewSpacing = 12.0;
    // 카드뷰 목록 노출 시작 x축 위치 자동 설정
    CGFloat cardViewXPosition = horizontalMargin;
    // ****************************** //
    // 카드 자체에 대한 세팅
    // 카드 높이 길이 (상하 길이) 설정
    CGFloat cardViewHeight = 160.0;
    // 카드 좌우 길이 phone size 참조하여 자동 조정
    CGFloat cardViewWidth = [UIScreen mainScreen].bounds.size.width - horizontalMargin * 2;
    // 카드뷰 안에 내용 들어가는 공간까지의 margin
    CGFloat basicMarginInCard = 10.0;
    CGFloat defaultFontSize = 16.0;
    // ****************************** //

    // 카드뷰들을 생성하고 뷰에 추가합니다.
    for (int i = 0; i < cryptocurrencyNames.count; i++) {
        UIView *cardView = [[UIView alloc] initWithFrame:CGRectMake(cardViewXPosition, cardViewTopStartMargin + i * (cardViewSpacing + cardViewHeight), cardViewWidth, cardViewHeight)];

        // 카드뷰 모서리를 둥글게 설정합니다. 조건 1
        cardView.layer.cornerRadius = 8.0;
        // cardView의 경계를 기준으로 내용물이 보이는 영역을 제한합니다. masksToBounds를 YES로 설정하면, cardView의 경계 밖에 있는 모든 내용물은 자르고 숨깁니다(클립 됩니다). 즉 뷰의 경계 값을 초과한 부분을 자르기 위해 masksToBounds를 YES로 설정합니다. 반면 masksToBounds가 NO인 경우(기본값)에는 뷰의 경계 밖에 있는 내용물이 그대로 보이게 됩니다.
        cardView.layer.masksToBounds = YES;

        // UILabel의 텍스트 색상 및 배경색 설정
        // 카드뷰 배경색을 설정합니다.
        if (UITraitCollection.currentTraitCollection.userInterfaceStyle == UIUserInterfaceStyleDark) {
            // 다크모드인 경우
            cardView.backgroundColor = [UIColor darkGrayColor];
            [self.view addSubview:cardView];
        } else {
            // 라이트모드인 경우
            cardView.backgroundColor = [UIColor lightGrayColor];
            [self.view addSubview:cardView];
        }

        // UILabel 객체를 생성합니다. 이 레이블은 암호화폐의 이름을 표시할 것입니다.
        // 따라서 CGRect를 사용하여 레이블의 위치와 크기를 설정하며, 왼쪽 위 모서리에서 시작합니다.
        UILabel *cryptoNameLabel = [[UILabel alloc] initWithFrame:CGRectMake(basicMarginInCard, basicMarginInCard, cardViewWidth / 2 - 20, 20)];
        // 레이블의 텍스트를 설정합니다. 여기에서는 cryptocurrencyNames 배열의 i 번째 요소를 사용합니다.
        cryptoNameLabel.text = cryptocurrencyNames[i];
        cryptoNameLabel.font = [UIFont systemFontOfSize:defaultFontSize];
        // 생성한 cryptoNameLabel을 cardView의 서브뷰로 추가합니다. 이렇게 함으로써 레이블이 카드 뷰에 표시됩니다.
        [cardView addSubview:cryptoNameLabel];


        // 암호화폐 가격 레이블을 생성하고 카드뷰에 추가합니다. 조건 3
        UILabel *cryptoPriceLabel = [[UILabel alloc] initWithFrame:CGRectMake(cardViewWidth / 3, basicMarginInCard, cardViewWidth / 2 - basicMarginInCard, 20)];
        cryptoPriceLabel.text = cryptocurrencyPrices[i];
        cryptoPriceLabel.textAlignment = NSTextAlignmentRight;
        cryptoPriceLabel.font = [UIFont systemFontOfSize:defaultFontSize];
        [cardView addSubview:cryptoPriceLabel];

        // 활성화 스위치를 생성하고 카드뷰에 추가합니다. 조건 4
        UISwitch *activationSwitch = [[UISwitch alloc] initWithFrame:CGRectMake(cardViewWidth / 7 * 6, cardViewHeight - 40, 200, 40)];
        [activationSwitch addTarget:self action:@selector(onSwitchValueChanged:) forControlEvents:UIControlEventValueChanged];
        [cardView addSubview:activationSwitch];

        // 거래소 이름 레이블을 생성하고 카드뷰에 추가합니다. 조건 5
        UILabel *exchangeNameLabel = [[UILabel alloc] initWithFrame:CGRectMake(10, cardViewHeight - 25, cardViewWidth - 20, 20)];
        exchangeNameLabel.text = @"Binance";
        exchangeNameLabel.font = [UIFont systemFontOfSize:defaultFontSize];
        [cardView addSubview:exchangeNameLabel];
        [scrollView addSubview:cardView];
    }
    // 상하 스크롤 최대치 자동 설정
    CGFloat contentHeight = cryptocurrencyNames.count * (cardViewHeight + cardViewSpacing);
    scrollView.contentSize = CGSizeMake(self.view.bounds.size.width, contentHeight);
}

- (void)onSwitchValueChanged:(UISwitch *)sender {
    dispatch_async(dispatch_get_main_queue(), ^{
        NSLog(@"Switch value changed: %@", sender.isOn ? @"ON" : @"OFF");
    });

}

@end
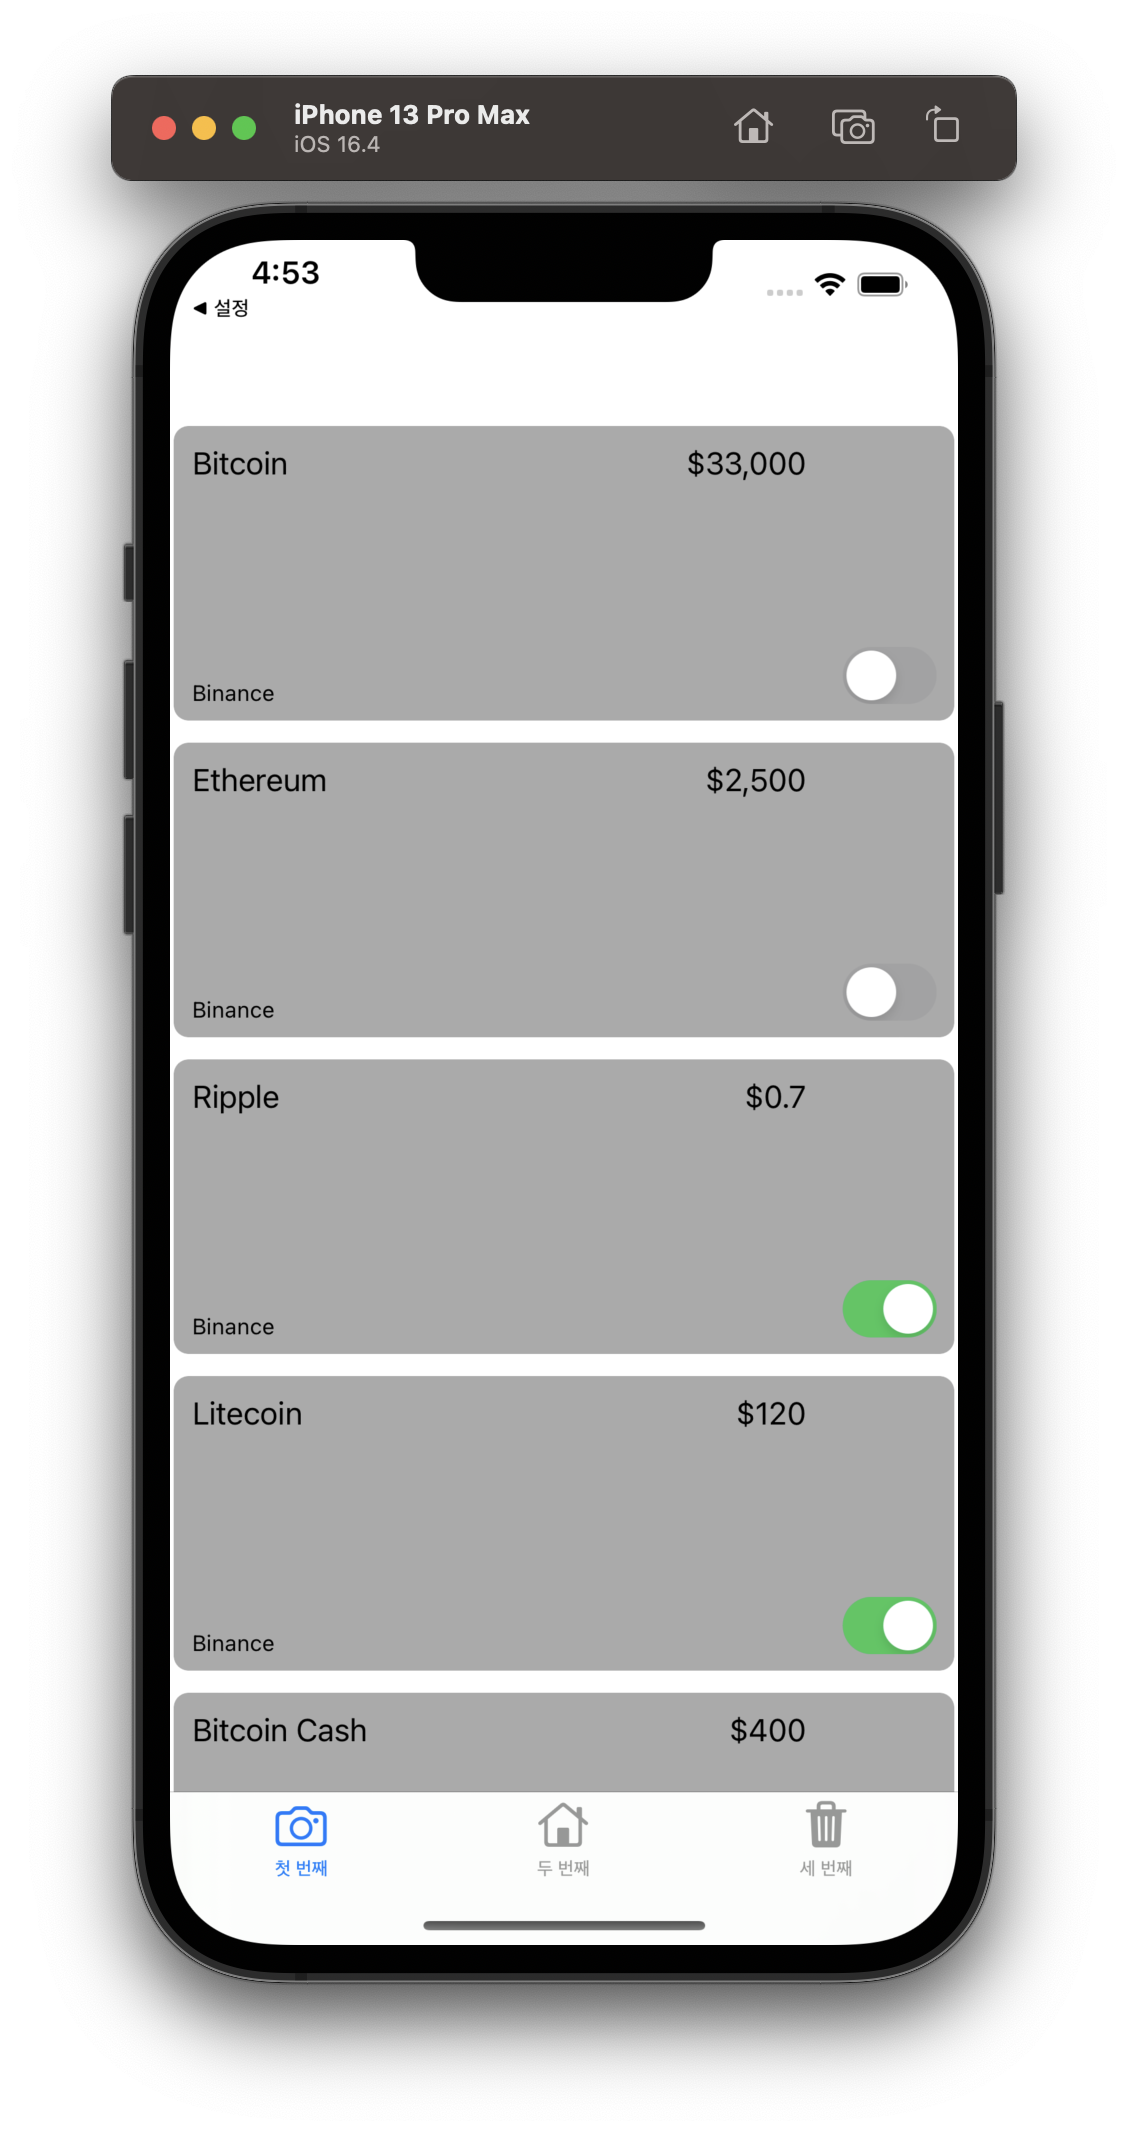
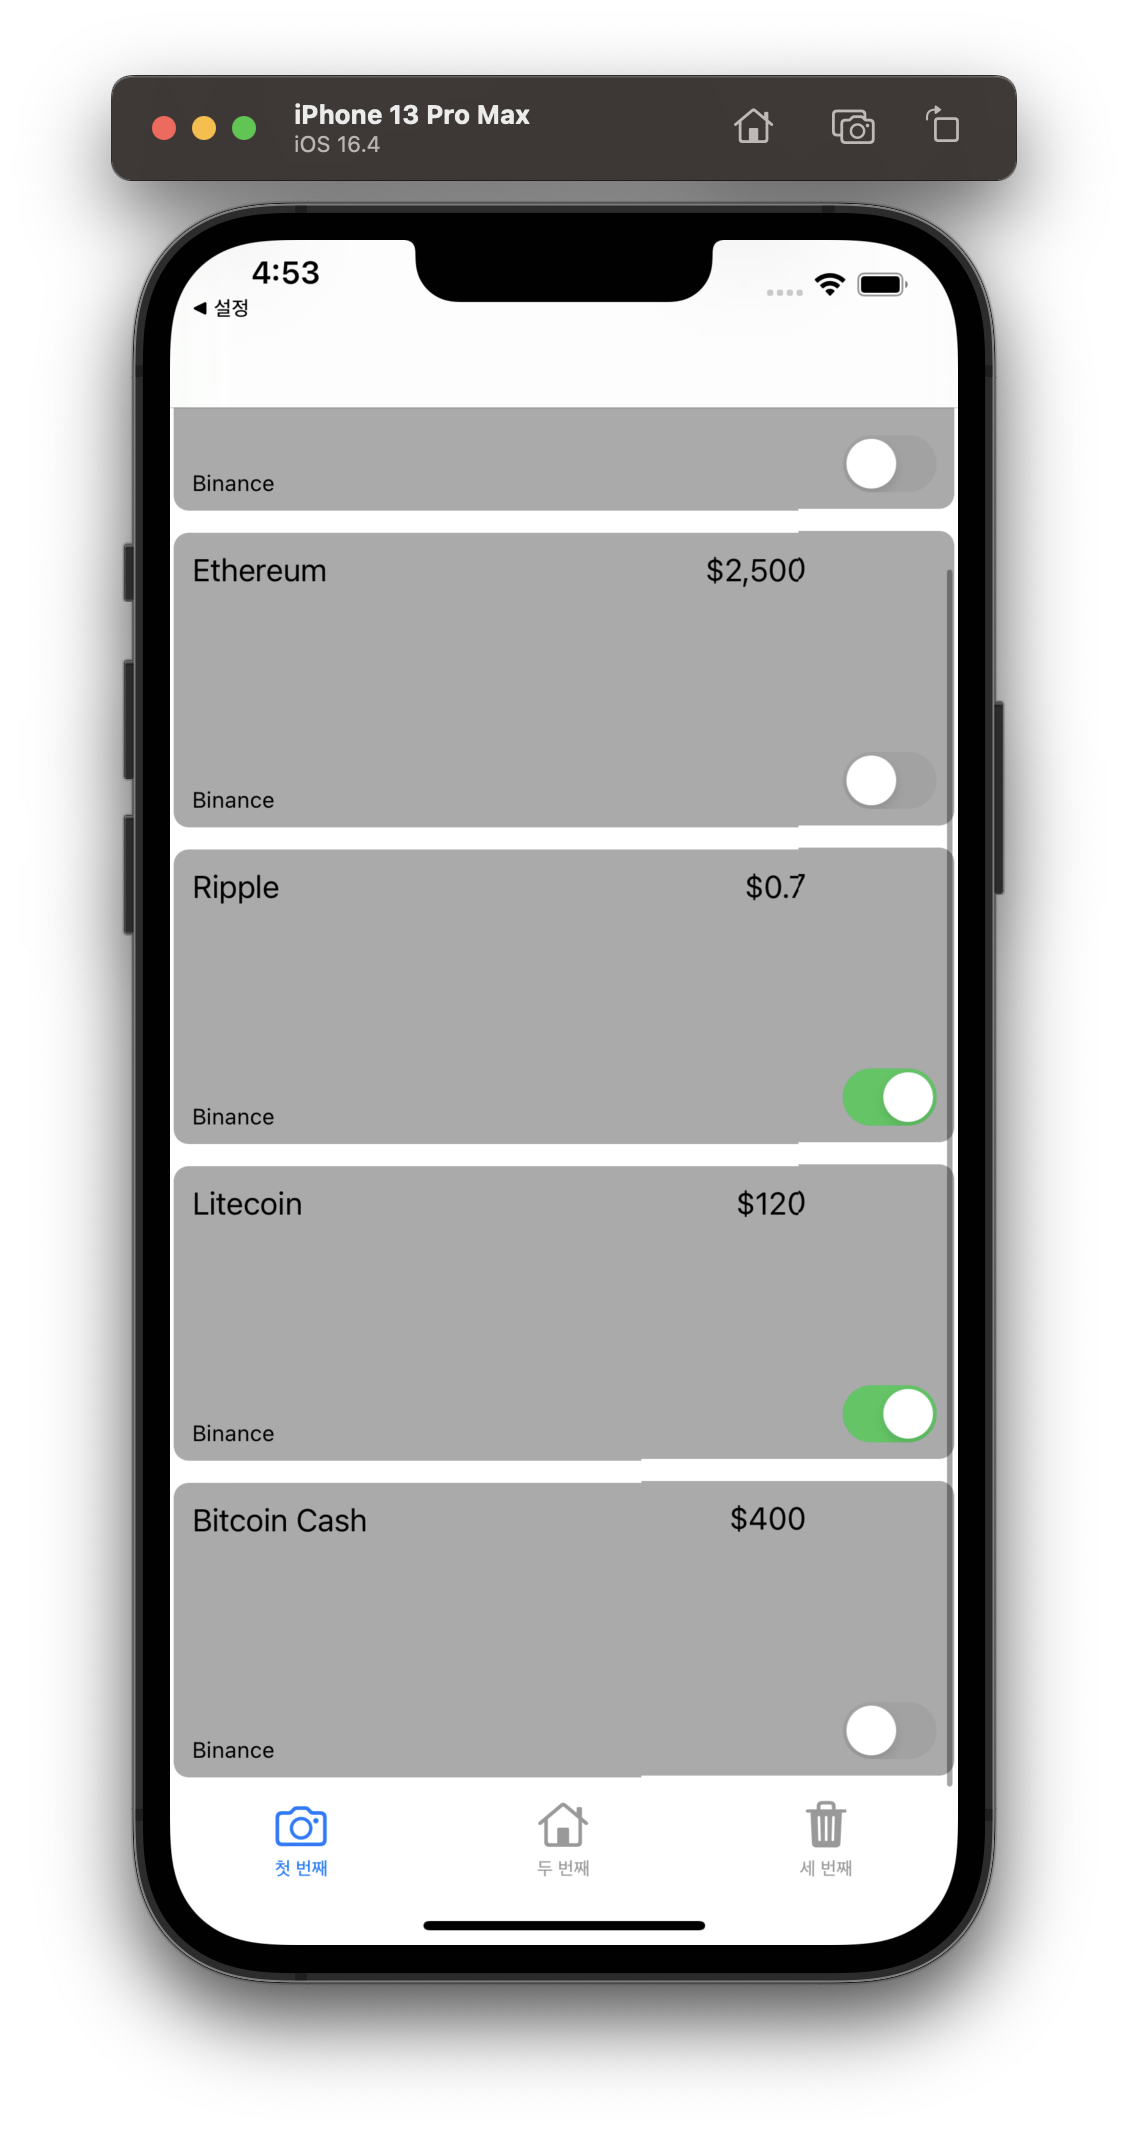
6. 결과 예시
- 다크 모드
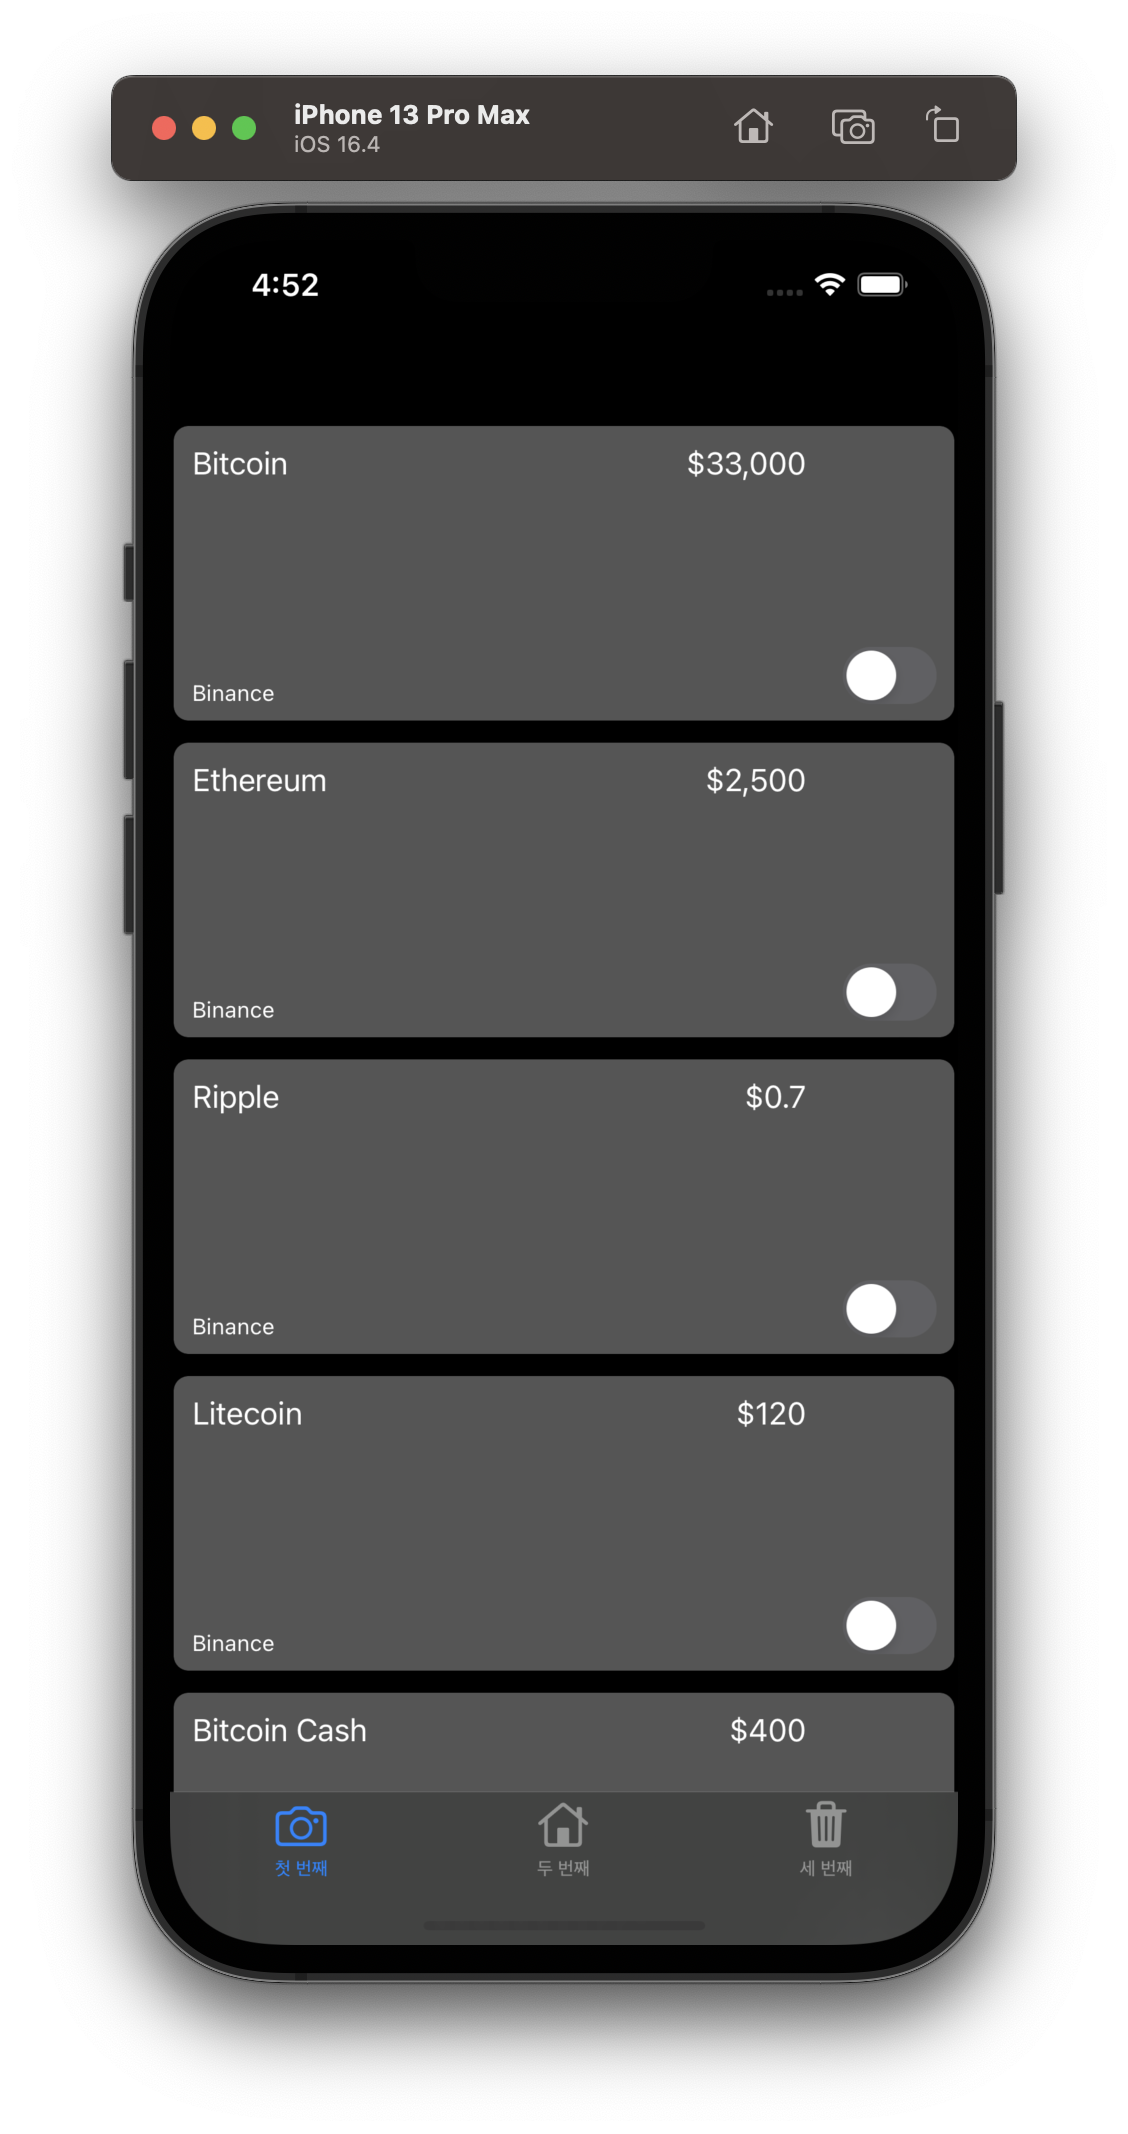
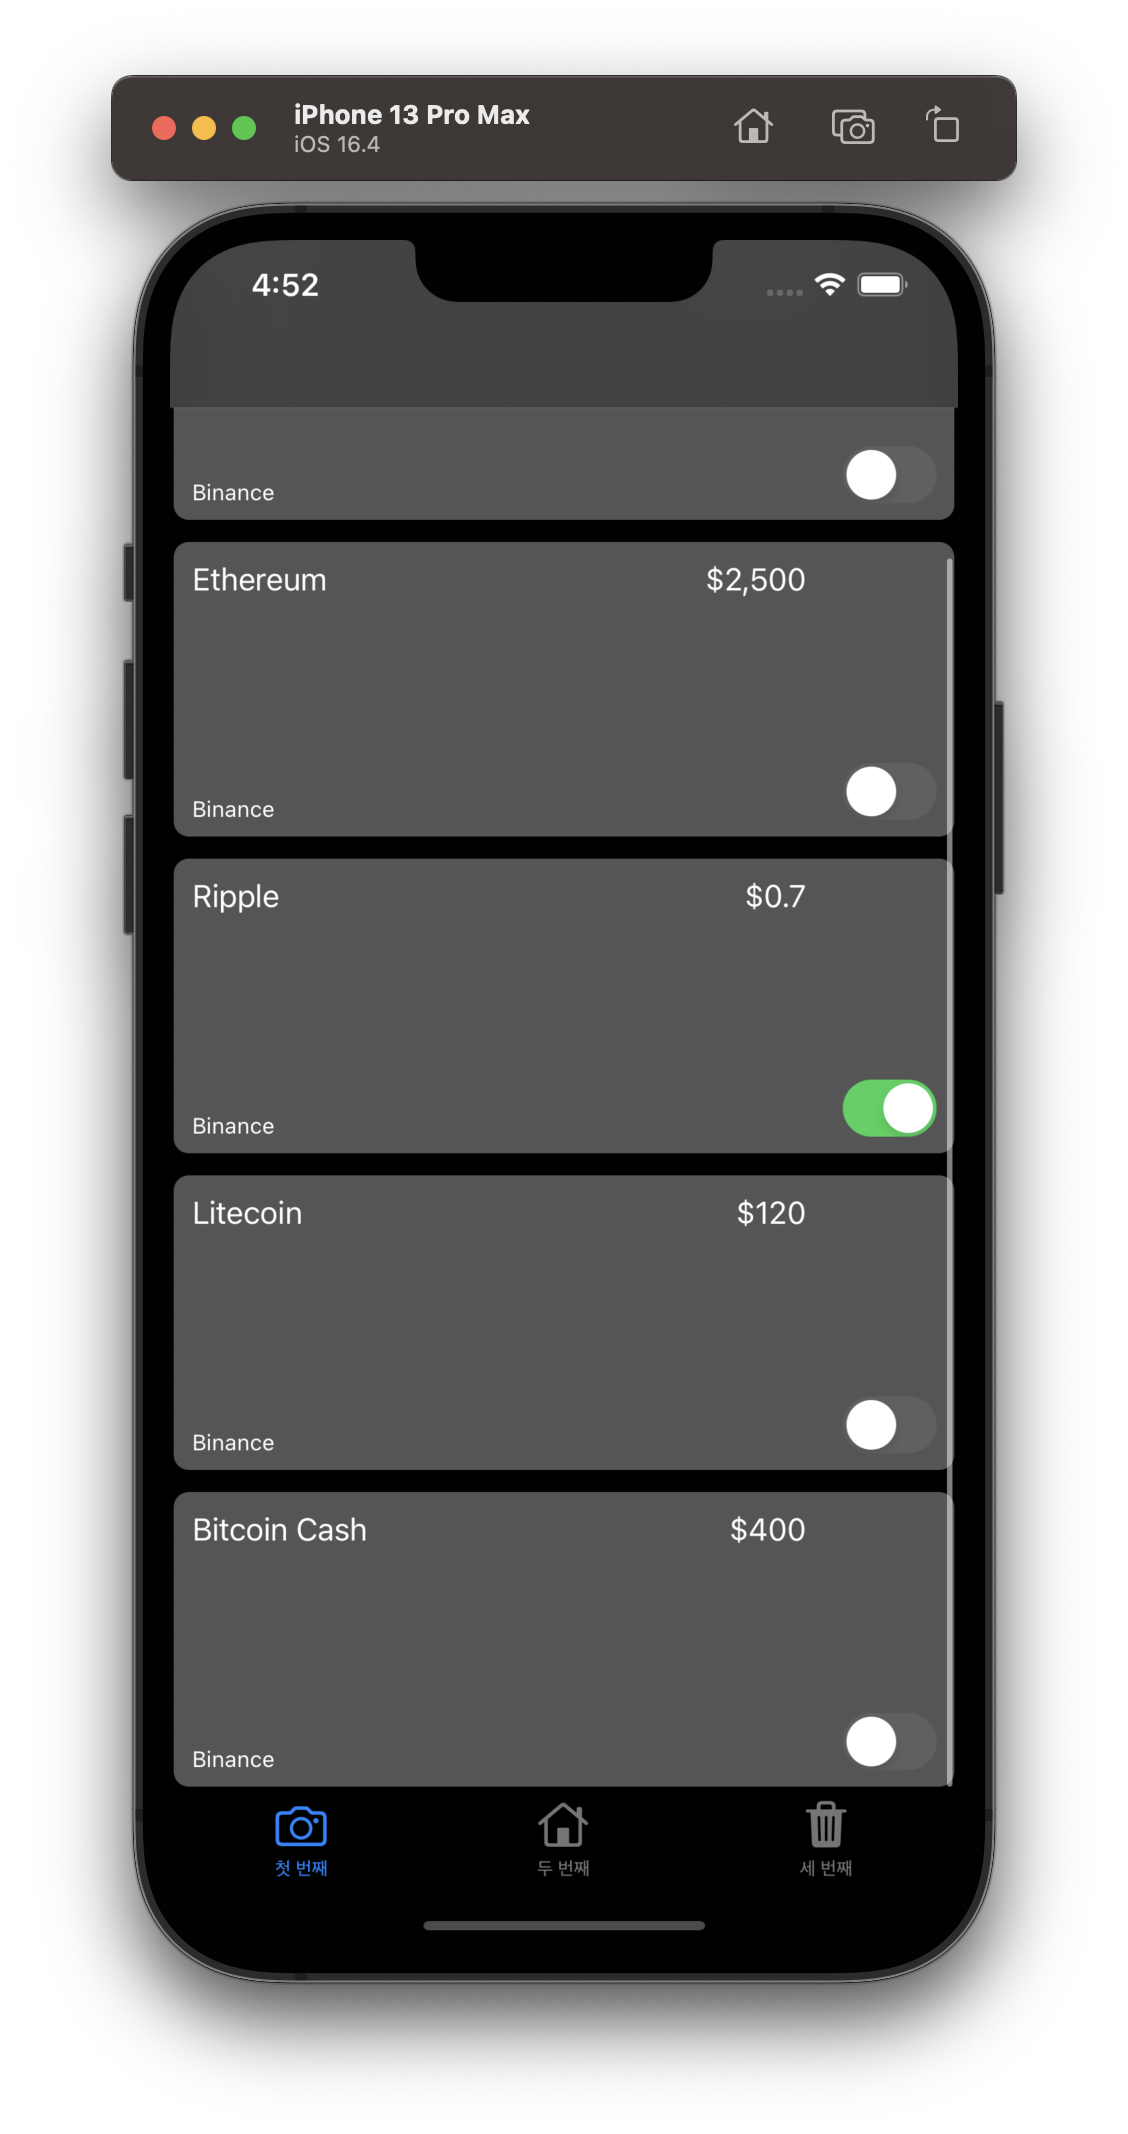
- 라이트 모드
'Development > iOS' 카테고리의 다른 글
| [Objective-C] 앱 만들기 입문 - 5 : api call 후 return받은 데이터 사용하기 (0) | 2023.07.07 |
|---|---|
| [Objective-C] 앱 만들기 입문 - 4 : json file 읽어서 저장된 데이터 사용하기 (0) | 2023.07.06 |
| [Objective-C] 앱 만들기 입문 - 2 : 세로 정렬 카드뷰 만들고 안에 문구 및 활성화 스위치 넣기 (0) | 2023.06.30 |
| [Objective-C] 앱 만들기 입문 - 1 : 하단 메뉴탭바 만들기 (0) | 2023.06.30 |
| [Objective-C] 입문하기 - 15 : extern const 사용해 외부 공유 가능한 상수 정의 및 호출 (0) | 2023.06.30 |