[ 개발환경 ]
Centos 7.5

1. 기본 세팅
아래와 같이 필요 파일 및 디렉토리 생성
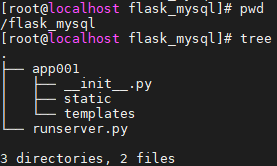
2. __init__py 파일 및 runserver.py 파일 작성
# vim app001/__init__.py

from flask import Flask

app = Flask (__name__)

from app001 import routes
__init__.py 파일이 실행되면서 routes의 내용을 가져오도록 작성
# vim runserver.py

from app001 import app

if __name__ == '__main__':
    app.run(host='0.0.0.0', port='5001', debug=True)
3. DB 설치 및 로그인 관련 database & 계정 정보 table 생성
Centos7 이므로 아래 링크를 참조하여 MariaDB 설치 진행, 저는 보안을 위해 3306 기본 포트를 33906 으로 변경해줬습니다.
https://growingsaja.tistory.com/250
CREATE DATABASE IF NOT EXISTS `pythonlogin` DEFAULT CHARACTER SET utf8 COLLATE utf8_general_ci;
USE `pythonlogin`;

CREATE TABLE IF NOT EXISTS `accounts` (
	`id` int(11) NOT NULL AUTO_INCREMENT,
  	`username` varchar(50) NOT NULL,
  	`password` varchar(100) NOT NULL,
  	`email` varchar(100) NOT NULL,
    PRIMARY KEY (`id`)
) ENGINE=InnoDB AUTO_INCREMENT=2 DEFAULT CHARSET=utf8;

INSERT INTO `accounts` (`id`, `username`, `password`, `email`) VALUES (1, 'test', 'test', 'test@test.com');
비밀번호의 경우, 일단 내용을 그대로 저장하지만 이후 8번째 실습에서 bcrypt를 통한 암호화 데이터로 저장 및 전수송되도록 수정할 예정입니다.
4. DB의 작업용 계정 생성
3번에서 만들어준 pythonlogin 데이터베이스에 대한 모든 권한을 cluser에게 줍니다. %가 아니라 localhost로 세팅하시는 것이 보안에는 더 좋으나, 작업의 편의를 위해 모두 열어두었습니다.
CREATE USER 'cluser'@'%' IDENTIFIED BY 'zmffnwj2020';
GRANT ALL PRIVILEGES ON pythonlogin.* TO 'cluser'@'%';
FLUSH PRIVILEGES;
SHOW GRANTS FOR 'cluser'@'%';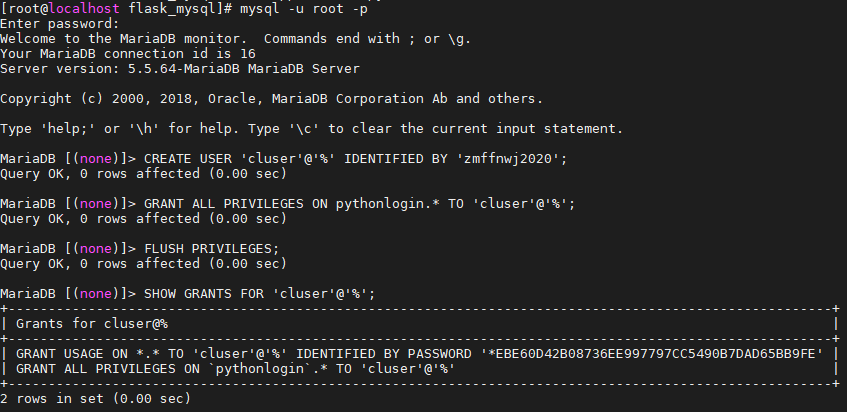
5. 웹페이지 생성을 위한 css 파일 생성
// vim app001/static/style.css //

* {
  	box-sizing: border-box;
  	font-family: -apple-system, BlinkMacSystemFont, "segoe ui", roboto, oxygen, ubuntu, cantarell, "fira sans", "droid sans", "helvetica neue", Arial, sans-serif;
  	font-size: 16px;
  	-webkit-font-smoothing: antialiased;
  	-moz-osx-font-smoothing: grayscale;
}
body {
  	background-color: #435165;
  	margin: 0;
}
.login, .register {
  	width: 400px;
  	background-color: #ffffff;
  	box-shadow: 0 0 9px 0 rgba(0, 0, 0, 0.3);
  	margin: 100px auto;
}
.login h1, .register h1 {
  	text-align: center;
  	color: #5b6574;
  	font-size: 24px;
  	padding: 20px 0 20px 0;
  	border-bottom: 1px solid #dee0e4;
}
.login .links, .register .links {
  	display: flex;
  	padding: 0 15px;
}
.login .links a, .register .links a {
  	color: #adb2ba;
  	text-decoration: none;
  	display: inline-flex;
  	padding: 0 10px 10px 10px;
  	font-weight: bold;
}
.login .links a:hover, .register .links a:hover {
  	color: #9da3ac;
}
.login .links a.active, .register .links a.active {
  	border-bottom: 3px solid #3274d6;
  	color: #3274d6;
}
.login form, .register form {
  	display: flex;
  	flex-wrap: wrap;
  	justify-content: center;
  	padding-top: 20px;
}
.login form label, .register form label {
  	display: flex;
  	justify-content: center;
  	align-items: center;
  	width: 50px;
  	height: 50px;
  	background-color: #3274d6;
  	color: #ffffff;
}
.login form input[type="password"], .login form input[type="text"], .login form input[type="email"], .register form input[type="password"], .register form input[type="text"], .register form input[type="email"] {
  	width: 310px;
  	height: 50px;
  	border: 1px solid #dee0e4;
  	margin-bottom: 20px;
  	padding: 0 15px;
}
.login form input[type="submit"], .register form input[type="submit"] {
  	width: 100%;
  	padding: 15px;
  	margin-top: 20px;
  	background-color: #3274d6;
  	border: 0;
  	cursor: pointer;
  	font-weight: bold;
  	color: #ffffff;
  	transition: background-color 0.2s;
}
.login form input[type="submit"]:hover, .register form input[type="submit"]:hover {
  	background-color: #2868c7;
  	transition: background-color 0.2s;
}
.navtop {
  	background-color: #2f3947;
  	height: 60px;
  	width: 100%;
  	border: 0;
}
.navtop div {
  	display: flex;
  	margin: 0 auto;
  	width: 1000px;
  	height: 100%;
}
.navtop div h1, .navtop div a {
  	display: inline-flex;
  	align-items: center;
}
.navtop div h1 {
  	flex: 1;
  	font-size: 24px;
  	padding: 0;
 	margin: 0;
  	color: #eaebed;
  	font-weight: normal;
}
.navtop div a {
  	padding: 0 20px;
  	text-decoration: none;
  	color: #c1c4c8;
  	font-weight: bold;
}
.navtop div a i {
  	padding: 2px 8px 0 0;
}
.navtop div a:hover {
  	color: #eaebed;
}
body.loggedin {
  	background-color: #f3f4f7;
}
.content {
  	width: 1000px;
  	margin: 0 auto;
}
.content h2 {
  	margin: 0;
  	padding: 25px 0;
  	font-size: 22px;
  	border-bottom: 1px solid #e0e0e3;
  	color: #4a536e;
}
.content > p, .content > div {
  	box-shadow: 0 0 5px 0 rgba(0, 0, 0, 0.1);
  	margin: 25px 0;
  	padding: 25px;
	background-color: #fff;
}
.content > p table td, .content > div table td {
	padding: 5px;
}
.content > p table td:first-child, .content > div table td:first-child {
	font-weight: bold;
	color: #4a536e;
	padding-right: 15px;
}
.content > div p {
	padding: 5px;
	margin: 0 0 10px 0;
}
6. DB연동에 필요한 라이브러리 flask-mysqldb 설치
$ yum install mariadb-devel
$ pip install flask-mysqldb

7. mysql과의 연동을 위한 내용을 routes.py에 작성
# vim app001/routes.py

from flask import render_template, request, redirect, url_for, session
from flask_mysqldb import MySQL
import MySQLdb.cursors
import re
from app001 import app

app.secret_key = 'your secret key'

app.config['MYSQL_HOST'] = 'localhost'
app.config['MYSQL_USER'] = 'cluser'
app.config['MYSQL_PASSWORD'] = 'zmffnwj2020'
app.config['MYSQL_DB'] = 'pythonlogin'
app.config['MYSQL_PORT'] = 33906

# Intialize MySQL
mysql = MySQL(app)
8. 로그인 페이지 테스트용 route 설정
# vim app001/routes.py

# ...

# http://host:5001/login/ - this will be the login page, we need to use both GET and POST requests
@app.route('/login/', methods=['GET', 'POST'])
def login():
    return render_template('login.html', msg='testing now')
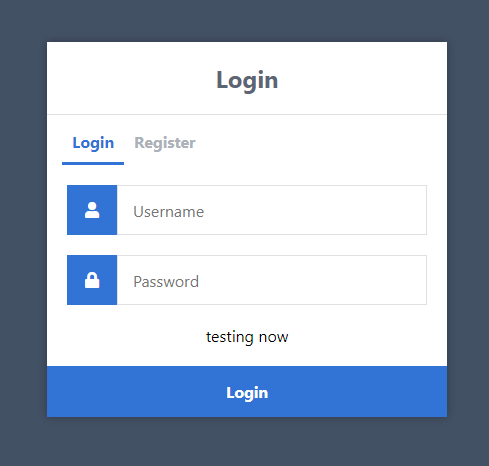
9. 로그인 템플릿 생성
<!-- vim app001/templates/login.html -->

<!DOCTYPE html>
<html>
	<head>
		<meta charset="utf-8">
		<title>Login</title>
		<link rel="stylesheet" href="{{ url_for('static', filename='style.css') }}">
		<link rel="stylesheet" href="https://use.fontawesome.com/releases/v5.7.1/css/all.css">
	</head>
	<body>
		<div class="login">
			<h1>Login</h1>
			<div class="links">
				<a href="{{ url_for('login') }}" class="active">Login</a>
				<a href="#">Register</a>
			</div>
			<form action="{{ url_for('login') }}" method="post">
				<label for="username">
					<i class="fas fa-user"></i>
				</label>
				<input type="text" name="username" placeholder="Username" id="username" required>
				<label for="password">
					<i class="fas fa-lock"></i>
				</label>
				<input type="password" name="password" placeholder="Password" id="password" required>
				<div class="msg">{{ msg }}</div>
				<input type="submit" value="Login">
			</form>
		</div>
	</body>
</html>
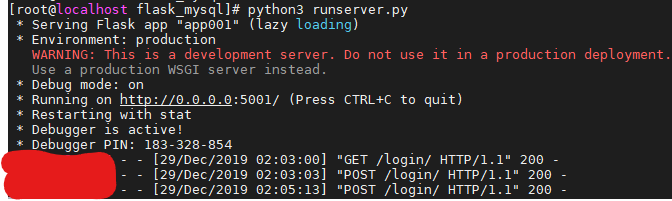
10. 정상 작동 여부 확인
- 웹서버 start 방법 : $ python3 runserver.py
웹에서 해당 주소 요청하여 정상적으로 출력되는지 확인
콘솔에서 정상적으로 로그 발생하는지 확인
-> 처음 접속시 GET 200
이후 아무 입력값 입력 후 Login 버튼 클릭시 POST 200
11. routes 파일 수정
로그인을 위한 데이터 post하여 받기 + DB에서 확인, 각 경우에 대한 return 설정
# vim app001/routes.py

# ...

# http://host:5001/login/ - this will be the login page, we need to use both GET and POST requests
@app.route('/login/', methods=['GET', 'POST'])
def login():
    # Output message if something goes wrong...
    msg = ''
    # Check if "username" and "password" POST requests exist (user submitted form)
    # username과 password에 입력값이 있을 경우
    if request.method == 'POST' and 'username' in request.form and 'password' in request.form:
        # 쉬운 checking을 위해 변수에 값 넣기
        username = request.form['username']
        password = request.form['password']
        # MySQL DB에 해당 계정 정보가 있는지 확인
        cursor = mysql.connection.cursor(MySQLdb.cursors.DictCursor)
        cursor.execute('SELECT * FROM accounts WHERE username = %s AND password = %s', (username, password))
        # 값이 유무 확인 결과값 account 변수로 넣기
        account = cursor.fetchone()
        # 정상적으로 유저가 있으면 새로운 세션 만들고, 없으면 로그인 실패 문구 출력하며 index 리다이렉트
        if account:
            session['loggedin'] = True
            session['id'] = account['id']
            session['username'] = account['username']
            return 'Logged in successfully!'
        else:
            msg = 'Incorrect username/password!'
    # Show the login form with message (if any)
    return render_template('login.html', msg=msg)
로그인 성공시, "Logged in successfully!" 출력됩니다.
로그인 실패시, msg에 잘못된 username/password 입력되었다는 문구와 함께 login 페이지 리다이렉트됩니다.
'Development > Flask with Python' 카테고리의 다른 글
| [Flask1.1][Mysql] 실습 - 3 : 프로필 화면 추가 및 프로필 링킹 버튼 정상화 (0) | 2020.01.02 |
|---|---|
| [Flask1.1][Mysql] 실습 - 2 : 홈 화면 추가 및 로그아웃 기능 구현 (0) | 2020.01.02 |
| [Solved][Centos7] ERROR: Command errored out with exit status 1: python setup.py egg_info Check the logs for full command output. (0) | 2019.12.29 |
| [Python3][Flask1.1] html에서의 if문 사용법 (0) | 2019.12.17 |
| [Solved][Flask1.1] 외부 css 파일 적용 방법 (0) | 2019.12.16 |